Tag Archives: Xailer 8.1

Xailer 8.1 – Help generator

The new version incorporates a complete help generator in HTML format that allows creating the help of any management application in a very simple and powerful way.

As of version 8.1, the TForm control (form) includes a new property named XHtmlHelp. When you click on the edit button in the property inspector you will be shown this HTML editing screen:

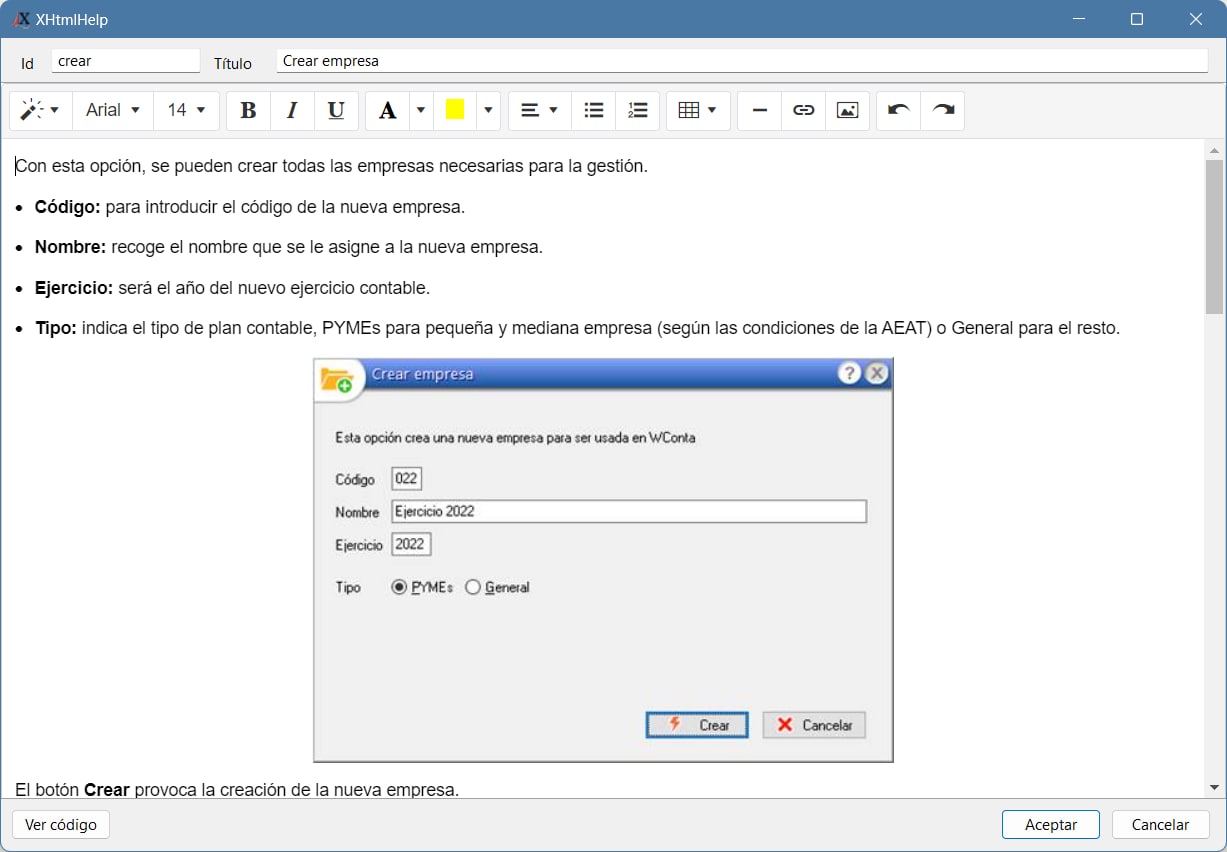
The ID corresponds to the identifier of the help page for that form and the title is the text that will be displayed at the top of the page. It is mandatory to enter some ID, however, the title is not mandatory. If you leave it blank, that page will simply not have a title and the area that the title occupies will disappear.

Our XVC version control system automatically manages the existence of these files and includes them in the repository, without you having to do anything else. If you’re using SVN, you’ll need to add the files manually via Tortoise SVN or via the command line.

Clicking on the menu option Project->Project Helps will show us the help manager, which looks like the following

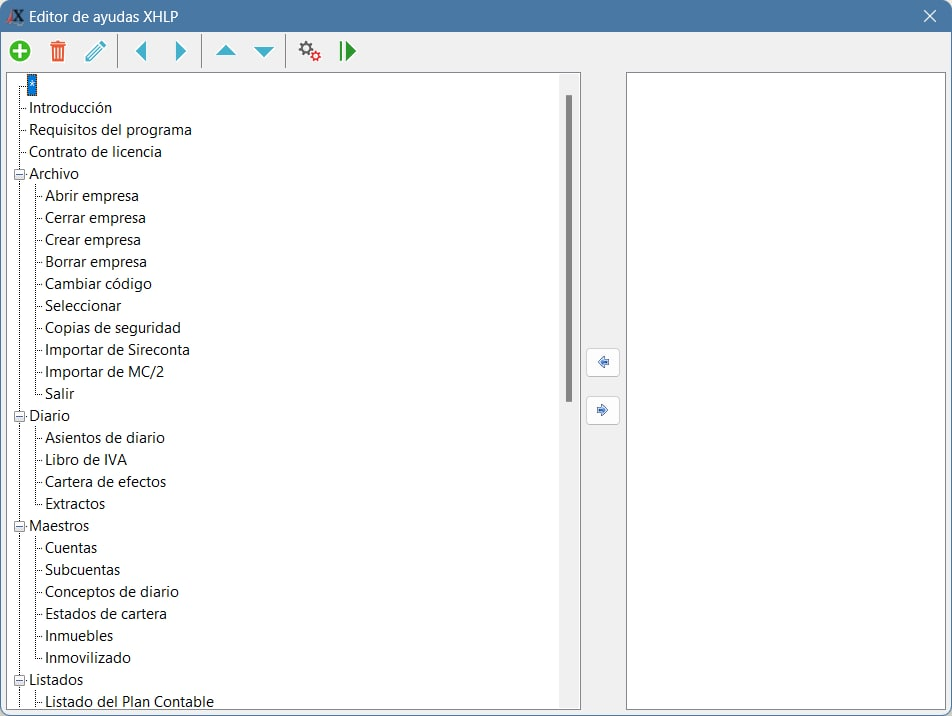
On the right side, all the help assigned to each of the forms are initially shown and it is your responsibility to move them to the left side to build the table of contents. Once moved to the table of contents (left side), you can use the arrow buttons to move up, down or change its nesting in a simple way. It is not necessary that all help pages that you create appear in the table of contents.

Note that there is a button with some gears that allows you to compile the help in a single file with the extension .XHLP. Logically, said file should be incorporated as one more file of the application that you want to distribute or deliver to your client. Xailer creates with all the aids a single compressed file, with a proprietary format, only accessible through our aid manager.

In the editor you can include all the help text. It is possible to incorporate images, tables, text styles and links to web pages or any other help page. For the latter, you must use the word ‘help://‘ as a protocol. For example, if you wanted to put a link to the page ‘NewCustomer’, you would write the link as: ‘help://NewCustomer‘. That’s all.

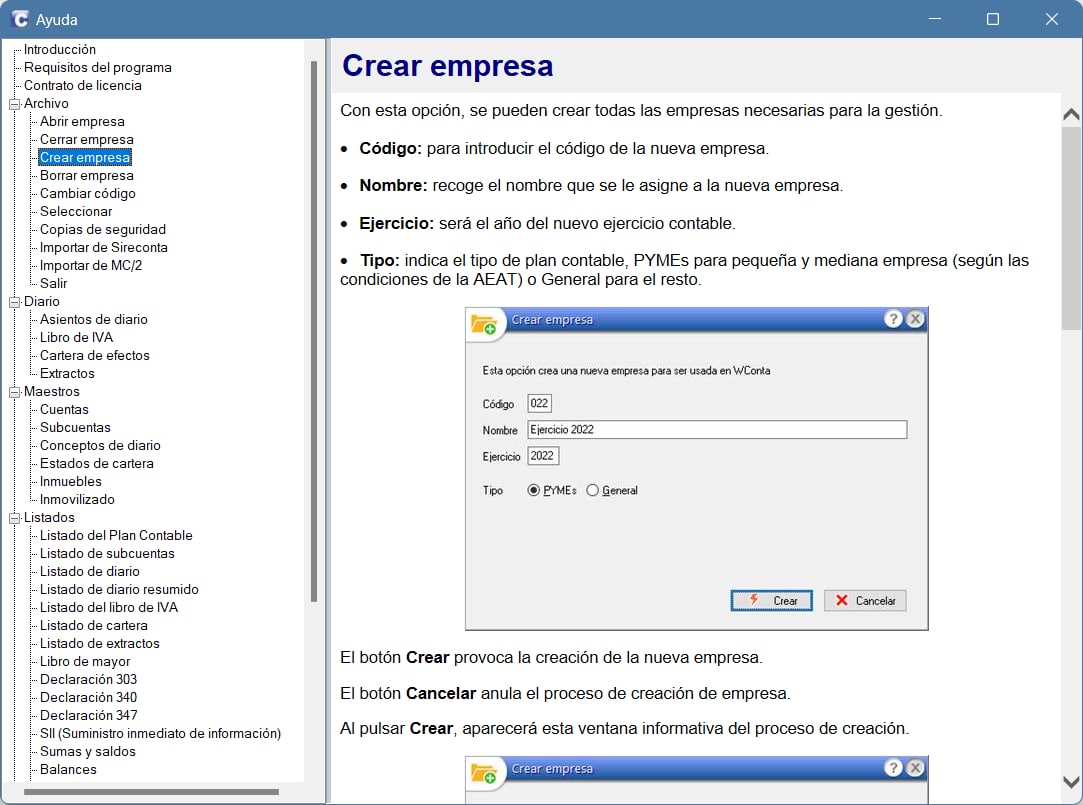
For our entire help system to work, you only have to add a line of code at the beginning of our application, which is:

Application:oHelp := THelp():New( "MiFichero.XHLP" )

When the user presses the F1 key on any form, the help for that particular form will be displayed. For example:

There are no more excuses for making 100% professional applications. I hope you liked it.

Regards,

Xailer 8.1 – New HTML editor control

This new control allows you to edit HTML documents in a completely visual way and with some complexity since it allows you to include tables and images.

The control is based on the Summernote control, which is a simple editor made in JavaScript, which is especially light, hardly consumes resources and whose license allows commercial use.

This control inherits from the TWebView control which is a Microsoft Edge based web browser control that is only available for Xailer Enterprise.

No need to include any SummerNote source code, everything is self-contained. Its behavior is exactly the same as any other Xailer control.

Important note: images are saved inside the document

More shortly.

a cordial greeting

Xailer 8.1 – New control TAnimatedGif

This control allows you to display animated GIFs with absolutely no lag or stuttering. And this is because the painting is done completely at a low level and in a second thread, which has a very high degree of complexity.

With this animated GIF control there is no need to call ProcessMessages() for the control to continue painting correctly.

It is available for any version of Xailer, even the personal one.

More shortly.

a cordial greeting

Xailer 8.1 – Support of High DPI Desktop Application Development

Xailer 8.1 includes High DPI support, which allows you to get the maximum resolution out of powerful 4K monitors. To activate it you just have to set the Appliction:lDpiAware property to true at the beginning of your application execution. That is all. What this property really does is that your program recognizes the true resolution of the monitor.

When windows is running on a high-resolution monitor and scaling other than 100% is set, programs receive “adjusted” resolution feedback, not the actual resolution. In the same way, when a program sets certain coordinates in a window, windows readjusts those coordinates according to the value of the scale that it has established. For example, if windows is set to 150% scaling, when a program sets the dimensions of a window to 400×400 pixels, windows resets it to an actual size of 600×600 pixels, including all controls within it. .

This means that we do not have to worry about the scale that Windows has configured, but it has the drawback that the texts and images look blurred. When we set Application:lDpiAware to .T., our program will work with real coordinates, with no adjustments by windows. The images and texts will look perfectly sharp and in their original size, even if this means that they will appear smaller than expected. In these cases, we can use the Application:nScale property to adjust the desired scale without losing the sharpness of images and texts.

More on Xailer 8.1 shortly.

All the best

Xailer 8.1 – Enhancements on TDataset

This is a small improvement, but I think it is worth mentioning since it may interest more than one.

For the purists of the view-controller model, the use of the classic Xailer Data-controls is not appropriate, since all the editing process also occurs in the view, when it should be done in the controller. The most convenient way to avoid this problem is to use objects of type TMemDataset that return a memory recordset that is completely unbound from the table from which it came. But it has the disadvantage that the insert and edit operations are more complex since it requires the construction of the insert and update SQL strings manually. Let’s see how Xailer 8.1 solves this problem with a small example:

CLASS TControlador
  oDataSource
  METHOD RSClientes( oRs )
  METHOD ClientesUpdate( oRs, nId )
END CLASS
METHOD RsClientes( oRS as CLASS TMemdataset ) CLASS TControlador
  WITH OBJECT ::oDatasource
    IF oRs != NIL
      :QueryMemDataset("SELECT * FROM CLIENTES", "", oRs )
    ELSE
      oRs := :QueryMemDataset("SELECT * FROM CLIENTES")
    ENDIF
  END WITH 
RETURN oRs
METHOD ClientesUpdate( oRS, nId ) CLASS TControlador
  WITH OBJECT ::oDatasource
    TRY
      :BeginTrans() 
      :Execute(oRs:SqlUpdate("idCliente", nId ))
      // Aquí se pueden hacer más operaciones de forma clara  
      :CommitTrans()  
    CATCH
      :RollbackTrans()
    END
  END WITH 
RETURN NIL

The update operation is performed in the controller with the additional advantage that we can include any operation within the same transaction. For this, the new method SqlUpdate( aWhereCols, aWhereValues) is used, which creates the SQL statement with only the columns that have changed their value. As you can imagine, there is also a new method called SqlInsert().

Another of the peculiarities that this code has in its RsClientes() method that I think is very interesting is that the TMemDataset object is passed as a parameter, instead of being created in the method itself and returned as a return value, which could be the first approach that any programmer would make. This technique has a great advantage, which consists of being able to incorporate an empty TMemDataset into the form itself and even link it to a browse in which we have completely defined the columns and everything visually. If our method were responsible for creating the TMemdatset and returned it as a return value to then assign it to the browse with oBrowse:oDataset := oController:RsClientes(…) we would observe how all our browse columns would disappear since a new dataset and that causes a reset of the entire control. On the contrary, if we pass the recordset as a parameter, everything is perfectly maintained.

And that’s all, for now. Soon, more news.

All the best

Xailer 8.1: Enhancements on TWebDatasource

Xailer 8.1 will be published in the near future and in a series of short articles we will explain the new features that Xailer 8.1 will incorporate, leaving the most important ones for last. This is one of them.

The next version of Xailer 8.1 incorporates everything necessary to be able to do without any type of FTP connection. That is, all the classic operations that are carried out by FTP, such as:

  • file upload
  • file download
  • file deletion
  • file renaming
  • directory listing
  • directory creation
  • deletion of directories
  • They are included in the new TWebDataSource class.

Note: The FTP services that TWebDatasource includes are limited to the directory where the PHP module is located and its dependent directories.

The use of the FTP protocol is becoming more complex every day due to the different existing options: secure FTP through digital certificate (FTPS) that can be implicit or explicit, through SSH protocol (SFTP) or non-secure FTP. Unfortunately the support of Microsoft Windows in its WININET library for any type of FTP apart from the non-secure one is null and the most appropriate option to attack this problem would have been to use the CURL library that is available in Harbour, but its use is complicated since it requires installing quite a few DLLs. The other option would be to use CURL by command line, which has been available in Windows for a long time, but that means having to ‘launch’ a console program from our application that programmers and users don’t usually like, and neither do antivirus programs.

For all these reasons and an additional one, which is that it is practically impossible for port 80 to be closed (which is the one used by the Web), we have decided to incorporate into our TWebDatasource class all the services that any class of file handling by ftp.

But already put, we have added one more service, which is the possibility of sending emails using one of the most used libraries in PHP, which is PHPMailer. As with the database access credentials to include in the PHP file, the same is true for the credentials for sending mail. In the PHP file itself and under the XA_SendMail() function, in a very simple way and without having to know anything about PHP, you can set all the parameters you want to send emails.

We remind you that this class is only available in the Enterprise version of Xailer.

All the best